
YASHICA FX-3 Manual (English) - Part 1
그 많은 사람들이 제대로 알고있는거다. 나에게 카메라는 그거 하나다.
하지만 요즘 나에게 다가오는 녀석이 하나 있으니 완전 수동카메라인 YASHICA FX-3다.
아버지께서 생전에 쓰시던 카메라로 한동안 사용할줄을 몰라 먼지가 쌓여가던 중
내가 이래저래 카메라에 흥미 가지면서 알아봤더니 이젠 슬슬 이 녀석에게 끌린다.
메뉴얼을 구하긴 했는데 영문이라 좀 아쉽지만, 이 정도는 해석할 수 있으니까.. 후훗.
(posted 3-30-02)
* This manual contains the instructions for both the Yashica FX-3 Super and FX-7 Super. However, the illustrations used in it
are those of the FX-3 Super with a Yashica ML 50 mm F1.9 lens. The procedure is exactly the same for both models, and
when equipped with other interchangeable lenses.
CONTENTS
Description of Parts 6
Mounting and Dismounting the Lens 10
Battery Installation 12
Film Loading 16
Setting the Film Speed 22
Focusing the Lens 24
Shutter Speed and Aperture 28
Exposure Setting 30
Taking Pictures 34
Film Rewinding 36
Exposure Compensation 38
Bulb Exposure and Infrared Photography 42
Using the Self-Timer 44
Flash Photography 46
Depth of Field 50
Camera care 52
Specifications 56
DESCRIPTION OF PARTS
1. Exposure Counter
2. Film Advance Lever
3. Shutter Release Button
4. Shutter Speed Dial
5. Film Speed Ring
6. Shutter Speed Index4www.butkus.org
7. Flash-Ready Signal Contact
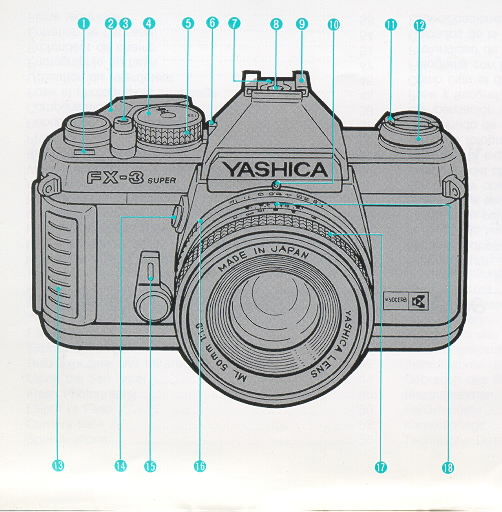
8. Direct X Contact
9. Accessory Shoe
10. Lens Mounting Index
11. Film Rewind Crank
12. Film Rewind Knob
13. Grip
14. Lens Release Button
15. Self-Timer Lever
16. Aperture Ring
17. Focusing Ring4www.butkus.org
18. Aperture/Distance Index
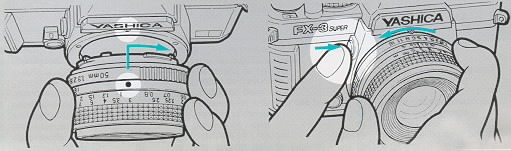
< Mounting the Lens > First, remove the camera body cap by turning it counterclockwise. Then align the red dot on the lens barrel with the
Lens Mounting Index on the camera body, fit in the lens and turn it clockwise until it locks in place with a click.

<Dismounting the Lens>
While pressing in the Lens Release Button, turn the lens
counterclockwise as far as it will go, then pull it out toward the
front. Once the lens has been dismounted,
be sure to put the lens front cap and rear cap on the lens and the body
cap on the camera's lens mount to protect them.
· While mounting and dismounting the lens, do not touch the lens glass and the inside of the camera.
· If you are changing the lens with film in the camera, take care to prevent light from entering the inside of the camera.
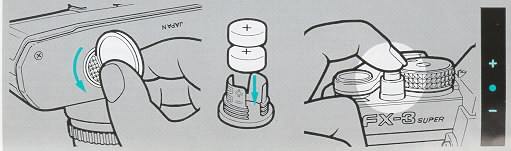
BATTERY INSTALLATION
Two 1.5 V alkaline batteries (LR44) or 1.55 V silver-oxide
batteries (SR44) are needed to provide power for the camera's exposure
meter.
1. Remove the Battery Compartment Cover by turning it with a coin.4www.butkus.org
2 Insert the two batteries inside the battery holder with the plus ( +
) side facing up as shown, then replace the holder in the compartment
and
tighten its cover.
< Battery Check >
Check the batteries with the LEDs in the viewfinder. If an
LED (red or green) turns on when the Shutter Release Button is pressed
halfway in, the
batteries are in good condition. If no LED turns on, they are exhausted
and must be replaced. Be sure to replace the two batteries at the same time.
Because the batteries are used to power only the exposure meter, the
camera operates even if they are exhausted or there are no batteries in
it.
< Battery Precautions>
· Silver-oxide batteries will last about one year, and
alkaline batteries about six months. However, their service life
differs depending on their capacity
at the time of purchase, the ambient temperature, and how often you
take pictures.
· Generally, the battery performance
decreases temporarily at low temperatures (under about 0°C). When
taking pictures in cold weather, it is
recommended to use new batteries and warm the camera before shooting.
The batteries affected by cold temperatures will function properly
again if
they return to normal temperature.
· Before installing the batteries, wipe both poles clean with a dry cloth because poor contact may result if they are soiled.
· If you are carrying your camera on a long trip, bring spare batteries with you.
· Never put batteries into fire or try to disassemble them because it is dangerous.
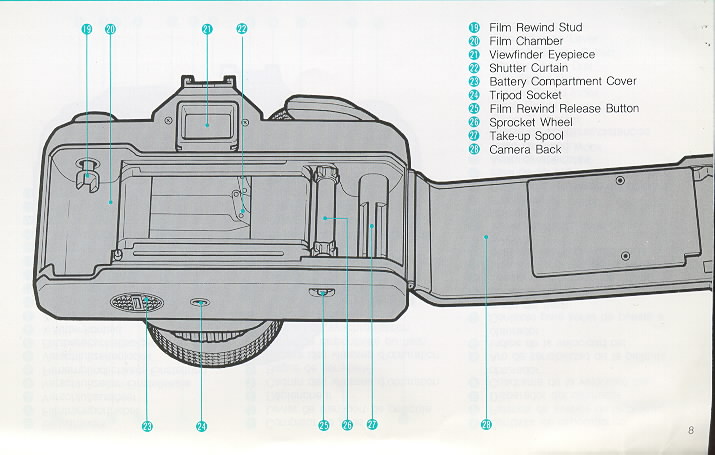
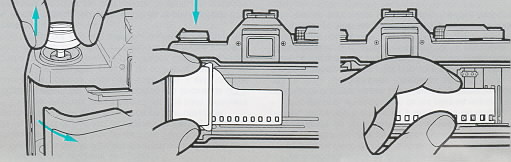
FILM LOADING
Use 35 mm cassette film. Always load and unload film in subdued light (never in direct sunlight).
1. Open the Camera Back by pulling the Film Rewind Knob all the way out.
2 Install the cassette in the Film Chamber
and push down the Film Rewind Knob. If it does not return smoothly to
its original position, push it
down while twisting it back and forth.
3. Pull out the film tip and insert it into any one of the slots in the Take-up Spool.
4. Operate the Film Advance Lever slowly to advance the
film. Make sure the sprocket teeth catch the perforations and close the
Camera Back.
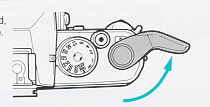
5. Fold out the Film Rewind Crank and turn it gently in the direction of the arrow to take up film slack.
< Film Advance Lever>
By turning the Film Advance Lever as far as it will go, the film will advance
one frame and the shutter will be cocked at the same time. Unless it is fully turned, the shutter will not trip.
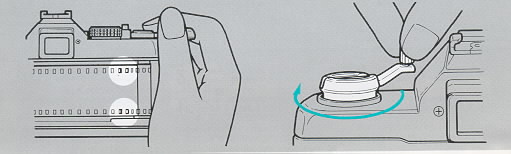
6. Wind the Film Advance Lever and depress the Shutter U
Release Button. Repeat this operation until the Exposure Counter shows
"1". The film is advancing
properly if the Film Rewind Knob turns while you wind the Film Advance
Lever.
<Exposure Counter>
The Exposure Counter will advance each time the Film
Advance Lever is wound, and return to "S" when the Camera Back is
opened. It is engraved with the letter "S"
and the numbers 1, 4, 6, up to 36. The numbers 12, 20, 24 and 36 are
marked in orange to indicate the end of film on commercially available
films.4www.butkus.org
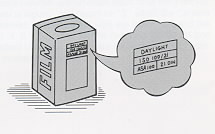
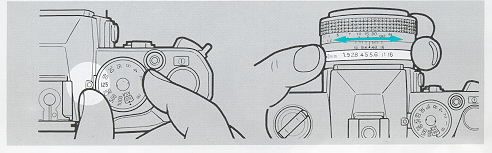
SETTING THE FILM SPEED
To obtain correct exposure, it is important to set the
film speed correctly. The speed of the film you are using is printed on
the film box.
To set the film speed, lift up the Film Speed Ring and turn it until the desired ASA speed comes opposite the index mark
(^).
The ASA speed settings on the Film Speed Ring are as follows
Focusing is done with a split-image focusing center, microprism collar and a surrounding matte screen.
FOCUSING THE LENS
<Focusing with the
Split-Image>
Turn the Focusing Ring until the two segments of the image divided by the 45° diagonal line in split-image center
fall in line. If the two segments are not aligned, your subject is not in sharp focus.
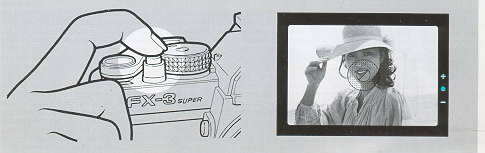
<Focusing with the Microprism Collar and Matte Screen >
Turn the Focusing Ring until your subject on the microprism collar or the matte screen
appears sharp. It is not in sharp focus if the image appears wavy on the microprism, or blurred on the matte screen.
· If you are using a lens with a large focal length or a
relatively "slow" lens or taking close-ups with high magnifications,
focusing may be difficult
because the microprism center will become dark. In such cases, focus on
the matte screen.4www.butkus.org

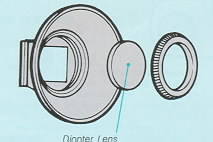
< Diopter Lenses >
If you are far- or nearsighted, special diopter lenses
(Contax, optional) are available in eight diopters: - 5D, - 4D, -3D,
-2D, OD, +1D, +2D and + 3D.
Choose one that suits your eyesight and fix it into the eye cup.

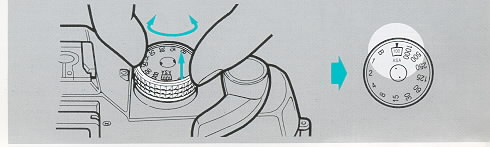
SHUTTER SPEED AND APERTURE
<Setting the Shutter Speed>
The shutter controls the time during which
light reaches the film. If the Shutter Speed Dial is turned to a one
step higher number prom 125 to 250, for example), the
amount of exposure will be reduced by half; if it is turned to a one
step lower number, the amount of exposure will be doubled. The numbers
"1", "2",...... "1000" on the dial represent 1, 1/2, ....... 1/1000
second, and the letter "B" is for bulb exposure.
To set the shutter speed, turn the Shutter Speed Dial and set the
number you want opposite the index. Be sure to set
it at the click position.
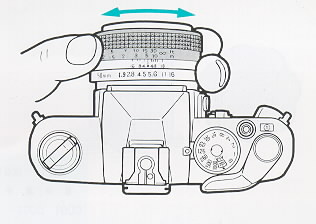
<Setting the Aperture>
The aperture controls the amount of light that reaches the
film. If the Aperture Ring is turned to a one step higher number prom 4
to 5.6, for example), the amount of
exposure will be reduced by half; if it is turned to a one step lower
number, the amount of exposure will be doubled. The aperture not only
controls the amount of
light, but allows you to take pictures by using the lens'
depth-of-field effect (see page 50). To set the aperture, turn the ring
and set the number you want (with click)
opposite the Aperture/Distance Index. Intermediate settings can also be
used.
EXPOSURE SETTING
Your camera features a center-weighted metering system which
measures the light intensity with emphasis on your subject in the
center of the
viewfinder. It also measures the brightness in the surrounding area.
The camera operates on manual exposure. At first, set the film speed.
You can choose any appropriate combination of shutter speed and
aperture to
obtain correct exposure.
If you press the Shutter Release Button halfway in, the
exposure meter will switch on and an LED will turn on in the viewfinder
to indicate exposure.
The LED will turn off as soon as you take your finger off the button.4www.butkus.org
As the exposure meter is based on a center-weighted system, always
place your subject in the center of the viewfinder for light metering.
Correct Exposure Only the green LED (a) turns on. If the green LED and a red (+) or (-) LED turn on at the
same time, it means slight over- or underexposure but you can go ahead and shoot. However, if you are using a shutter
speed of 1/30 sec. or slower, use flash or mount the camera on a tripod to prevent camera shake.
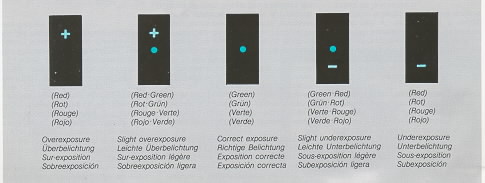
Underexposure Only the red (-) LED turns on. It means your subject is too dark. Open up the aperture or use a slower shutter speed to turn on the green LED.
출처 - http://www.butkus.org