
YASHICA FX-3 Manual (English) - Part 2
TAKING PICTURES
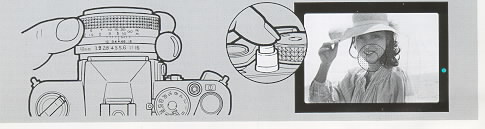
1. Set the shutter speed and aperture. 1 Turn the Shutter Speed Dial and Aperture Ring and set your desired values.
2. Focus the lens and frame your subject. While looking through the
viewfinder, turn the Focusing Ring to focus and compose your picture.
Check the exposure and shoot. ~ Press the Shutter Release
Button halfway in and check if the green LED turns on in the
viewfinder. If it turns on, take your
picture by pressing the Shutter Release Button all the way in.
<Exposure Meter Coupling Range> The following chart shows the shutter speeds that are usable at different ASA speeds.

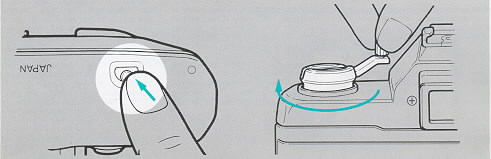
If you reach the end of the film, the Film Advance Lever will no longer
operate. Do not force it Check the Exposure Counter to make sure the
end of
the film is reached, wind the film back into its cassette and unload
the cassette. Send the exposed film for processing as soon as possible.
1. Press in the Rewind Release Button located on the camera bottom. You need not keep pressing it.4www.butkus.org
2. Fold out the Film Rewind Crank and turn it in the direction of the
arrow. Stop winding if you feel a sudden release of tension, then open
the Camera Back and
take out the cassette.
If there is a significant difference in brightness between
the main subject and its background, you will not be able to get
correct exposure in the
normal metering procedure. In this case, exposure compensation is
necessary.
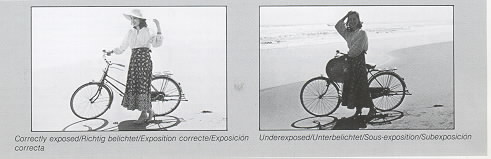
< Taking Back lighted Subjects>
If you are taking a back lighted subject or, if a bright background
occupies a large area of the picture frame (e.g. portraits with a
bright sky or sea in
the background, subjects standing against a window, etc.), your subject
will turn out underexposed and dark. In such cases, give twice or four
times
as much exposure so that it is correctly exposed.
Example: If the camera's exposure meter indicates F16 and 1/250 sec. to get correct exposure, make compensation as follows:
· Compensation with the Aperture Ring For 2X exposure compensation, turn the ring from F16 to F11, and for 4X, to F8.4www.butkus.org
· Compensation with the Shutter Speed Dial For 2X exposure compensation, turn the dial from 1/250 sec. to 1/125 sec., and for 4X, to 1/60 sec.
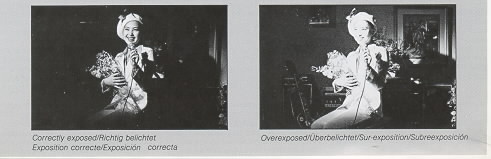
<Taking Spotlighted Subjects>
If
a dark background occupies a large area of the picture frame (e.g.
spotlighted subjects on a stage), on the contrary, your
subject will turn out overexposed and light. In such cases, reduce the
amount of exposure to half or one-fourth so that it is correctly
exposed.
Example:
If the camera's exposure meter indicates F4 and 1/60 sec. to get correct exposure, make compensation as follows:
· Compensation with the Aperture Ring For 1/2X exposure compensation, turn the ring from F4 to F5.6, and for 1/4X, to F8.
· Compensation with the Shutter Speed Dial For 1/2X exposure compensation, turn the dial from 1/60 sec. to 1/125 sec., and for 1/4X, to 1/250 sec.
BULB EXPOSURE AND INFRARED PHOTOGRAPHY
<"B" (Bulb) Exposure> If an exposure time
of 1 second or longer is required, set the Shutter Speed Dial at "B"
(bulb). The shutter will remain open as long as the
Shutter Release Button is kept depressed. To prevent camera shake,
mount the camera on a tripod and trip the shutter with a cable release
(optional).
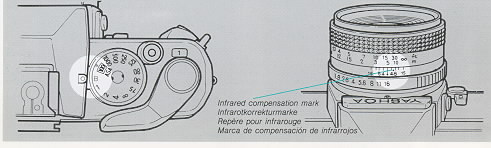
<Infrared Photography>
To take infrared pictures with black-and-white infrared
film (using a red filter), compensation is necessary because the point
of focus slightly shifts from that in
normal photography. Yashica ML lenses and Zeiss lenses are provided
with an infrared compensation mark on the depth of field scale (red dot
on ML lenses and red
line on Zeiss lenses). (There is no such mark on reflection type lenses
because they do not require compensation).
First, focus the lens without filter as you would do
normally. Then fit on a red filter and move the distance set on the
Focusing Rig opposite the infrared mark and
shoot.
· If you are using color infrared film, follow the instructions packed with your film.
USING THE SELF TIMER
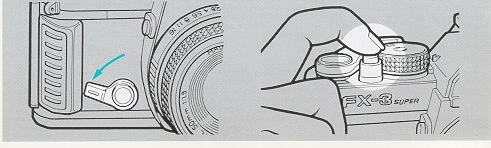
If you want to include yourself in the picture, mount the
camera on a tripod and trip the shutter with the aid of the self-timer.
1. First, focus the lens and set exposure.
2. Set the self-timer by pushing the Self-Timer Lever all the way down.
(The self-timer can be set either before or after advancing the
film.)
3. Make sure the film has been wound and
depress the Shutter Release Button. The self-timer will start and trip
the shutter in about 10 seconds.4www.butkus.org
FLASH PHOTOGRAPHY
If you are taking indoor or nighttime pictures, use a compact Yashica CS-202 Auto flash. It
will give you beautiful flash pictures.
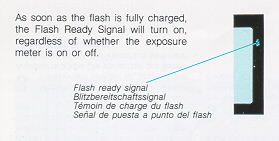
The Yashica CS-202 Auto is a system flash specially designed for
use with the Yashica FX-3/FX-7 Super. With this flash on the camera, a
flash
ready signal will automatically turn on in the viewfinder to indicate
that the flash is fully charged.
 |
This
flash signal will also turn on with the Yashica CS-201 Auto, Contax
TLA20 or TLA30 on the camera. However, the automatic shutter speed
switching function and direct TTL metering function will not operate.
|
< Synchronizing Shutter Speeds>
The Yashica FX-3/FX-7 Super has an X-contact hotshoe which
allows flash synchronization at shutter speeds of 1/125 sec. or slower.
<Using Other Flashes>
· The camera's Accessory Shoe is a direct-contact hotshoe.
You can use any other cordless type electronic flashes and flash bulbs.
· Use flash bulbs at shutter speed of 1/30 sec. or slower.
DEPTH OF FIELD
When the lens is focused on a subject, it will turn out sharpest
in the picture. However, the zone of sharpness extends over a certain
distance in front of and behind
the point the lens is focused on. This is known as the depth of field
of a lens and it varies as follows:
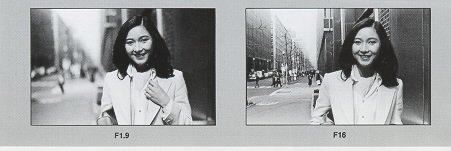
1. The smaller the aperture, the wider the depth of field, and vice versa.
2. The longer the camera-subject distance, the wider the depth of field, and vice versa.
3. The zone of sharpness behind the point the lens is focused on is wider than that in front of it.
Further, a lens with a shorter focal length has a wider depth of field than one with a longer focal length.
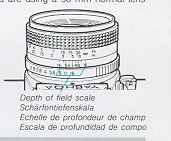
<Depth of Field Scale>
You can check the zone of sharpness on the Depth of Field Scale of your lens. If
you are using a 50 mm normal lens and have set the aperture at f16, you
will see the depth of field scale that the zone of sharpness extends from about 2.7 m to infinity (see
illustration).
CAMERA CARE
· Do not leave the
camera in a hot place (e.g. in direct sunlight, in a closed car, etc.)
for too long a time, because excessive heat may adversely affect
the film, batteries, or camera mechanism. If the camera has become too
hot, allow it to cool to normal temperature before use.
· After shooting seaside or mountain scenes,
clean the camera very carefully. Sea breezes may cause corrosion, and
sand and dust may cause
damage to the internal mechanism of the camera.
· Remove dust and dirt on the lens and viewfinder eyepiece with a soft lens brush or blower brush. Remove
finger marks by wiping off lightly with lens
tissue.
· In case the mirror is soiled, dust off lightly with a lens brush. Always take extra care to avoid scratches.4www.butkus.org
· Do not subject the camera to abrupt
temperature changes because moisture can condensate inside the camera
and cause faulty electrical contact.
· To clean the camera body, wipe it clean with a soft cloth. Never use
benzine, thinner and other solvents.
· If you are not likely to use the camera for
an extended period of time, remove the batteries and store it away from
heat and moisture.
· Before you take your camera on a trip or for special events, be sure to check beforehand if it functions normally.
· Remember, the picture area that will appear on a certain size of print might be slightly smaller than that of the negative.
To :take full advantage of the performance of this camera, it is advisable to use
Yashica//Contax interchangeable lenses and accessories
specially designed for it. We may not be responsible for the trouble that might occur as a result of use of other
makers products.
SPECIFICATIONS
Type: 35 mm single-lens reflex camera with focal plane shutter.
Negative Size: 24 x 36 mm
Lens Mount: Contax/Yashica mount. Shutter Vertically running metal focal-plane shutter.
Shutter Speeds: B (bulb), 1 to 1/1000 sec. (12 steps).Flash Synchronization: X contact hotshoe (synchronizes at 1/125 sec. or slower).
Self-Timer Mechanical with about 10-sec. delay. Shutter Release: Mechanical.
Exposure Metering: Through-the-lens, full-aperture center weighted light metering with SPD cell; manual exposure with LED display; metering range: EV 2--18 (with ASA 100 and 50 mm F1.4 lens); ASA 12--1600 film speed range; exposure meter switch activated by pressing shutter release button halfway in.
Exposure Meter Power Source: Two 1.5 V alkaline (LR44) or 1.55 V silver oxide (SR44) batteries. 4www.butkus.org
Viewfinder: Eye-level, pentarism finder; 92% field of view and 0.91X magnification (with 50 mm lens at infinity).
Focusing Screen: Split-image/microprism.
Viewfinder Information: Display of correct exposure, over- and underexposure with 3 LEDs; flash signal indicating that the flash is fully charged.
Film Advance: Lever with 130° stroke and 20° stand-off.
Film Rewind: Film rewind crank. Exposure Counter Additive, auto reset. Dimensions: 135 (W) x 84.5 (H) x 50 (D) mm Weight: 445 9 (without batteries).
· Specifications and design are subject to change without notice.
출처 - http://www.butkus.org